Dr. Mukesh Sharma “Dairy Guru” and Dr Kranti Sharma1
Dairy Consultant
Why the Dry Period Matters
The dry period — the 45 to 65 days between the end of one lactation and the start of the next — is often treated as a quiet interlude on the dairy farm. In practice, it is one of the highest-leverage windows in the entire production cycle. What happens (or fails to happen) during these weeks determines udder health, colostrum quality, calf vigour, and peak milk yield for the whole lactation that follows.
Three benefits make the dry period non-negotiable:
- Mammary gland recovery – the udder tissue regresses, heals, and regenerates secretory cells ahead of the next lactation.
- Milk production optimisation – the cow’s body readjusts metabolically, which translates into a measurably higher peak yield next time round.
- Improved udder health – removing the continuous demand of milk synthesis lowers the incidence of mastitis and related infections.
What Happens Inside the Udder During the Dry Period
Involution of the udder proceeds through three overlapping phases, and each one needs a different kind of support from the herdsman:
- Udder repair – secretory tissue that was worn down over the lactation is broken down and rebuilt.
- Protection – a keratin plug forms in the teat canal, sealing it against environmental bacteria.
- Preparation – the gland re-primes itself for colostrum synthesis ahead of the next calving.
How Long Should the Dry Period Be?
With a 12–13 month calving interval, a dry period of 45 to 65 days is recommended. Both shorter and longer dry periods depress milk production in the next lactation, so the target is a fairly narrow window rather than “as long as possible.”
- First-calf heifers: 60–65 days (they need the longer end of the range to finish mammary development).
- Older, multiparous cows: fewer dry days are usually sufficient.
- The effect of dry-period length on subsequent production is also shaped by body condition at drying off and by feeding practices during the dry period itself — length alone is not the whole story.
| Stage | Typical Duration | Focus |
| Drying-off transition | 4–14 days | Feed and milking step-down |
| True dry period | 25–35 days | Involution, repair, rest |
| Pre-calving (close-up) | 14–21 days | Re-priming for colostrum & calving |
Table 1. The three phases of the dry period and their approximate durations.
The Challenges of the Dry Period
High-producing cows are harder to dry off safely, and three specific risks deserve close attention:
- Milk leakage – an unusually large milk volume at drying-off keeps the teat canal open longer, raising the risk of environmental mastitis.
- Delayed keratin plug formation – the natural seal that blocks the teat canal after the last milking takes longer to form in high yielders, extending the window of vulnerability.
- Elevated udder pressure – milk accumulating behind a still-open teat causes discomfort and stress, and predisposes to leakage and infection.
“A properly emptied udder, dried off at the right yield and body condition, responds far better to any dry cow therapy you put into it.”
Preparing the Cow for Drying Off
Good drying-off outcomes are decided well before the last milking. Four areas need to be reviewed on every cow, or at minimum every group:
- Optimising body condition score (BCS) – aim to dry off roughly 90% of the herd within a BCS of 2.5–3.0. Cows that are too thin or over-conditioned at drying off carry that imbalance straight into the next lactation.
- Reducing milk yield ahead of the final milking, so the udder is not overloaded when milking stops.
- Calculating the optimum dry period length for each cow — parity, body condition, and the previous lactation’s yield all feed into this decision.
- Reviewing dry cow feeding — energy density needs to drop as milking stops, then rise again in the close-up phase to support the transition into the next lactation.
Choosing a Drying-Off Method
There are two standard approaches, and the choice should be driven mainly by how much milk the cow is producing at the time of drying off.
| Abrupt Cessation | Gradual / Intermittent | |
| How it works | Milking stops in a single step, no step-down in frequency | Milking frequency is stepped down (e.g. twice-daily → once-daily) over 4–10 days |
| Best suited to | Low-to-moderate producers (typically <15 kg/day) | High-yielding cows (>20–25 kg/day), to reduce udder pressure before the final milking |
| Feed management | 3–7 days of feed restriction beforehand — cut concentrate, remove high-energy ration from the TMR | Combine with reduced concentrate and lower-energy forage during the step-down |
| Advantage | Simple to implement; widely recommended by veterinarians for most cows | Lowers intramammary pressure gradually, supporting faster and more complete teat-canal closure |
| Watch-out | Higher risk of engorgement and leaking if used on high-yielding cows without prior yield reduction | Must still finish with a clean, hygienic final milking and a full dry cow therapy protocol |
Table 2. Abrupt vs. gradual drying-off, compared side by side.
Step-by-Step Protocol for Drying Off
- 7–10 days before: Remove concentrate / high-energy feed; switch to a lower-energy, straw-based forage to blunt intake.
- 5–7 days before: Step down milking frequency — twice-daily to once-daily, or once every 36–48 hours.
- 3–5 days before: Restrict water access modestly if advised by your veterinarian, and only under supervision, to reduce yield further.
- Final milking: Milk out fully and cleanly — a properly emptied udder responds better to dry cow therapy.
- Dry-off day: Infuse a long-acting intramammary antibiotic (if indicated) plus an internal teat sealant into all four quarters.
- Days 1–14 post drying-off: House the cow in a clean, dry, low-stress area and monitor daily for heat, swelling, or discharge.
Dry Cow Therapy (DCT)
Dry Cow Therapy is the administration of long-acting intramammary antibiotics, with or without an internal teat sealant, at the point of drying off. It is the single most effective tool available for reducing new intramammary infections during the dry period and for clearing existing subclinical infections before they carry into the next lactation.
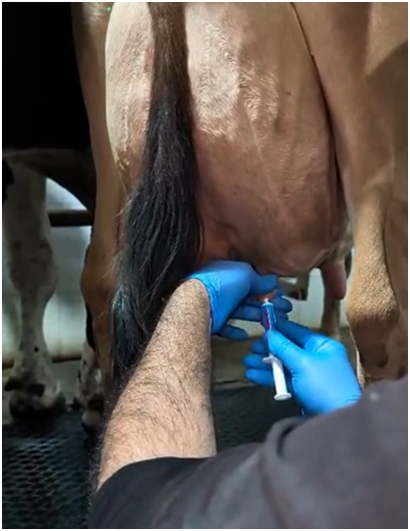
Photo 1. Intramammary infusion of long-acting antibiotic therapy into a teat at drying-off. The teat end has been disinfected before the syringe is inserted, and the operator wears clean gloves throughout the procedure.
Procedure for Dry Cow Therapy
A consistent, hygienic technique matters as much as the product used. The standard sequence on the farm is:
- Milk the udder out completely at the final milking — a full let-down gives the infusion the best chance of reaching all secretory tissue.
- Clean and disinfect each teat end thoroughly, working from the teats furthest from you to the ones nearest, and always finish the far teats first so you don’t re-contaminate a cleaned teat by reaching past it.
- Scrub the teat end itself with a separate alcohol swab immediately before infusion — this is the single most important hygiene step, since a dirty teat end can push bacteria straight into the gland.
- Insert only the tip of the antibiotic cannula into the teat canal (partial insertion technique) and infuse the full syringe content.
- Immediately follow with the internal teat sealant, using a fresh sterile applicator for every quarter.
- Massage the teat gently upward to disperse the product through the gland cistern, then dip the teat in an approved post-dip disinfectant.
- Repeat teat-end disinfection between every cow and every quarter — never reuse a swab, and never touch the infused teat end again before it re-seals.
“DCT is only as good as the hygiene around it — a contaminated teat end at the moment of infusion can introduce the very infection the therapy is meant to prevent.”
Internal Teat Sealants
An internal teat sealant is a non-antibiotic, bismuth-based paste infused into the teat canal at drying off. Unlike antibiotic therapy, it does not treat infection — instead, it forms an inert physical plug that mimics the cow’s own natural keratin seal, which (as noted earlier) can take several days to form on its own in high-yielding cows. This plug blocks bacteria from ascending into the gland during the vulnerable early dry period, and is typically used alongside — not instead of — antibiotic dry cow therapy in cows with a history of infection.
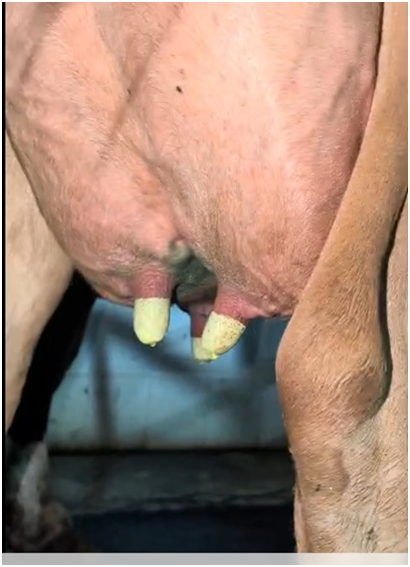
Photo 2. Internal teat sealant visible as a firm, wax-like plug extruding just below the teat ends after infusion, in the two rear quarters of this cow. This physical seal is designed to remain in place and be stripped out at the first milking after calving.
Good sealant technique follows the same hygiene discipline as antibiotic infusion:
- Infuse only after the udder has been fully milked out and the teat end thoroughly disinfected.
- Use the partial-insertion technique to avoid pushing surface bacteria up the teat canal.
- Massage the base of the teat, not the whole gland, since the sealant is meant to stay low in the teat canal rather than disperse through the udder.
- Warn milkers to strip out the plug at the first few milkings after calving — it must not be allowed into the bulk tank.
Conclusion
The dry period is not downtime — it is preparation time, for both the udder and the calf. A disciplined drying-off protocol, hygienic dry cow therapy with an internal teat sealant, and an active heat-abatement plan through the summer months together protect the investment already made in this lactation and set the floor for the next one. Herds that treat these six to eight weeks as seriously as they treat peak lactation consistently see it repaid in udder health, calf vigour, and milk yield.
Dr. Mukesh Sharma — “Dairy Guru”, Dairy ConsultantField photographs: author’s own herd records. Reference data on heat-stress effects on calf birth weight and maternal milk yield