Rafael Lozano – Global Incubation Consultant
Rafael Lozano holds a degree in Business Administration and has over 20 years of hatchery experience, primarily as a GP hatchery manager. He has also led multiple commercial hatcheries, deepening his expertise in broiler and layer incubation management. As Global Incubation Consultant at Petersime, Rafael’s role is to support customers in implementing incubation best practices, aiming to achieve excellence.
Hatcheries play a key role in poultry production by delivering top-quality day-old chicks that set the foundation for strong performance on the farm. One crucial factor influencing chick quality is the timing of their removal from the hatcher. Getting it wrong can lead to more second-grade chicks and higher first-week mortality. This article summarizes essential tips to help determine the optimal chick pull time.
Why pull time and post-hatch conditions are both critical
Pulling chicks at the right time is key to giving them the best possible start in post-hatch life. But timing alone doesn’t guarantee quality: the conditions new-born chicks are exposed to while waiting are just as important. If they stay too long in the hatcher under poor conditions, their quality and welfare suffer. And once removed from the hatcher, other factors come into play. Fluctuations in room pressure, washing of nearby machines… all can introduce extra stress and contamination risks.
That is why it is vital to recognize the right timing indicators and stay alert to environmental conditions while chicks are waiting. Only then can hatcheries truly optimize their operations and improve outcomes.
Pull time vs. hatch window
It is essential to distinguish between pull time and hatch window. The term ‘pull time’ (or ‘take-off’) refers to the moment in time when hatchery operators remove the trolleys with new-born chicks from the hatcher. The term ‘hatch window’ refers to the time range between the hatching of the first and last chicks.
| Pull time (Single moment) | Hatch window (Time range) | |
| What | The moment hatchery operators remove the chicks from the hatcher | The period between the first and last chicks hatching |
| Why | Important to choose the optimal moment: pulling at the right time enhances chick health and quality | Important to assess the hatch window spread: a narrow hatch window leads to more uniform chicks |
| How | Observing physical indicators and behaviourChecking wing feathers for excessive growthExamining eggshells for meconium stains | Counting hatched chicks at specific timesEstimating the hatch window by assessing embryonic stage uniformity at transferAnalysing the humidity curve during the hatching phase |
| Impact | Better chick comfort, stronger performance at farm level, lower first-week mortality | Better flock uniformity, which is beneficial during the entire growing phase and at slaughter |
How to choose the optimal timing for pulling chicks?
Sometimes hatcheries determine pull time based on chick delivery schedules and logistics. However, this clock-based approach can severely impact chick health, quality and performance on the farm. The decision to pull should be based on biological signals, not planning – for example by reading the hatch peak signal from the humidity curve. Once the vast majority (80-90%) of expected chicks have hatched, humidity inside the hatcher reaches its peak. From that moment, pulling should happen within the next 8 to 16 hours. This gives the last chicks time to dry and mature enough to move on to the next stage. Occasionally, a few late chicks may still be slightly wet when pulling starts – ideally no more than 5% with a damp neck (see also point 1). But waiting any longer, under unstable conditions, puts the earlier chicks at risk and compromises overall chick quality.
A practical way to assess the right timing for pulling chicks – without disturbing the hatching process – is to look through the hatcher door windows about 24 hours before the scheduled pull time. Ideally, 1% to 5% of the chicks should have hatched at that point. From there, it is expected that the majority – around 80% to 90% – will have hatched by the time the humidity curve reaches its peak. This typically happens 12 to 16 hours after the first 1% to 5% of chicks have hatched.
1. Physical indicators and behaviour
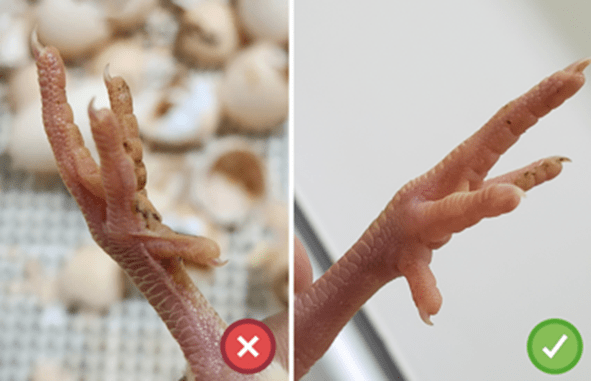
Chick appearance and behaviour during pull-out are valuable indicators of potential issues. If the timing was correct, nearly all chicks should be active, standing, dry and fluffy. Their legs should appear well-hydrated and shiny. Occasionally, a few (less than 5%) may have slightly damp necks – but none should be completely wet.
If chicks were held too long, signs of stress may appear, especially in suboptimal room conditions. You can expect to see loud, hyperactive chicks that may have already used up their yolk reserves. When environmental stress pushes them into survival mode, you will see panting chicks with dry legs due to dehydration.
2. Wing feather growth
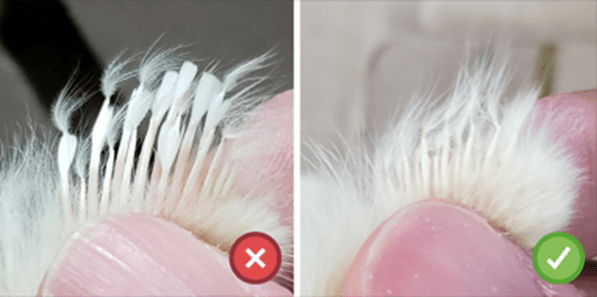
Normal feather development is a sign of healthy chick development during incubation. However, if many chicks show excessive wing feather growth, it usually indicates they hatched too early and stayed in the hatcher for too long.
3. Meconium score
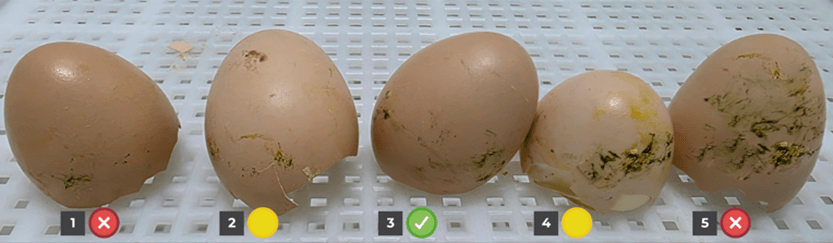
Hatch debris should contain an acceptable level of meconium. Excess meconium residues on eggshells indicate that chicks remained in the hatcher too long before being pulled. A quick assessment involves scoring eggshells from 1 to 5 – ideally with most around score 3. Scores 2 and 4 are also acceptable. But if many shells score 1 or 5, the setting time needs adjustment: start 2 to 4 hours earlier in case of score 1, or 2 to 4 hours later if score 5 dominates.
What are the consequences of an incorrect pull time?
When chicks are pulled too early, they may be classified as second-grade quality because they are not completely dry. It takes 4 to 6 hours after hatch for a chick to dry and become active. The hatching process demands a lot of energy and after this, they need time to recover from the effort made. If pulled too soon, they may also not be mature enough, which affects their growth and survival on the farm.
When chicks stay too long in the hatcher, they are more likely to be exposed to variable and suboptimal conditions. This increases the risk of dehydration, which can lead to a systemic failure in their basal metabolism – negatively affecting growth and feed efficiency during the flock’s later life.
In summary
The timing of pulling day-old chicks from the hatcher is crucial for their health, overall quality and performance on the farm. The ideal pull time is around 8 to 16 hours after the humidity peak. At that point, the chicks should have positive physical indicators, no signs of excessive wing feather growth, a meconium score of 3, and less than 5% with damp neck feathers. Understanding these indicators and recognizing that it is very challenging to keep chicks under optimal conditions inside the hatcher and during waiting times can make a real difference in producing strong and healthy chicks.
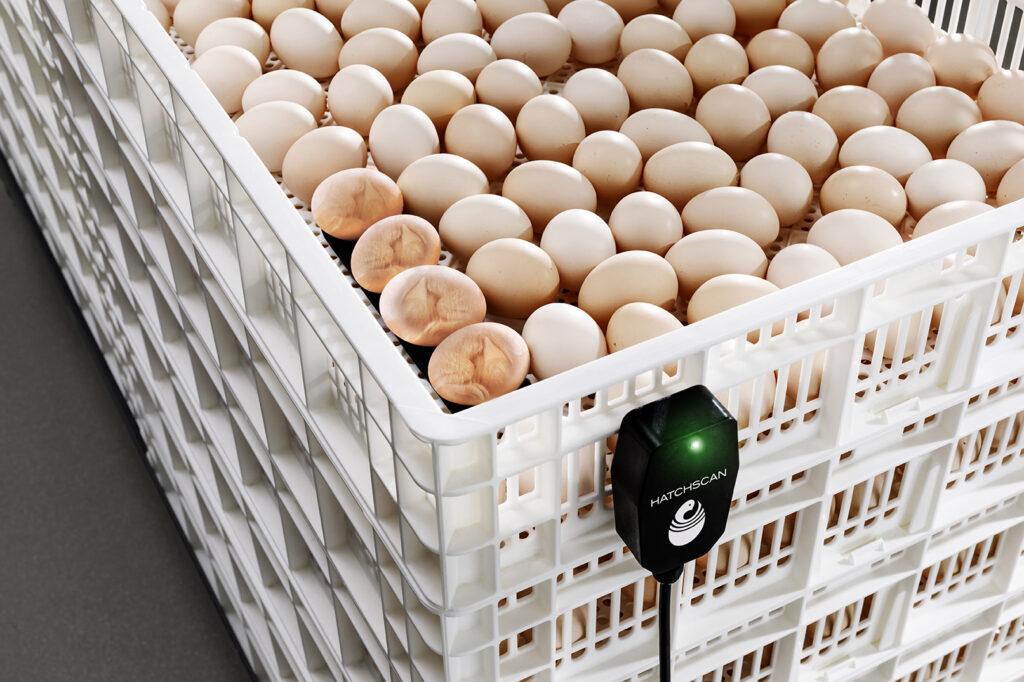
Technology can offer valuable support in maintaining the right conditions after hatch. Petersime’s HatchScan™ technology controls the ambient temperature directly in the hatcher baskets after the intense hatching process, ensuring the environment is ideal for the chicks to feel comfortable until trolley pull-out. For chick holding, Petersime’s Chick-Store machine creates a controlled climate that safeguards chick health and welfare, enabling hatchery managers to adjust transport schedules without compromising chick quality. Please don’t hesitate to contact us for more information.